
Oh my. I hope this isn’t the end of Spartan Ops. That would be extremely disappointing.
Category Archives: Spartan Ops
Spartan Ops Episode 4 Podtacular Podcast.
Once again I team up with POD Dust Storm of Podtacular to bring you our complete evaluation of a Spartan Ops episode and it’s related missions. This time it’s Episode 4.
Coming in at over one hour and 36 minutes you’ll find out some good stuff about the video and missons.
You can listen here or download the podcast
here
.
Enjoy and please feel free to leave some feedback by replying to this article.
-Sal
Spartan Ops Episode 9!
Whoo, this is a good one. Majestic is tasked by Lasky to save Halsey, while she is being hunted by Palmer. Hmm, awkward?
Me and some friends playing Spartan Ops, then this happened…
Those poor Covies got dropped off on the shelf rock and didn’t know how to get down from there.
So my firends and I had some fun with them and crouched walked in Mantises teasing them. After about a minute or so, we had enough fun and blew them away!
LOL
Good times, good times.
-Sal
A brief analysis of the Spartan IVs we interact with in Halo 4.
Let’s take a look at most of the Spartan IVs that we have seen in the game:
First the “Cons” of each, then the “Pros” of each.
Commander Sarah Palmer: She commands all of the Spartans of the Infinity, yet she makes sexist remarks like “Ladies and other Spartans.” She sized up Master Chief with a “come hither” look, smiled then said she thought he’d be taller. She seems to take every opportunity to berate her subordinates. Not a way to lead. “Eggheads” <–gawd, I’m SO tired of that phrase.
Fireteam Majestic Squad Leader, Paul DeMarco: Meathead. Clearly evidenced as per the dialogue in the first Spartan Ops vid. His and Madsen’s interaction with Thorne and Hoya cement them as nothing more than that, meatheads.
Spartan Madsen: see above. Also, what is with that goofy surprised look on his face when Thorne comes out of active camo in the Spartan Ops episode 8 video? Come on, you can’t tell me the Spartan IVs didn’t know about active camo. Who trained these yahoos?
Spartan Hoya: Seemed like a decent spartan, though he was a little insubordinate to DeMarco in the SpOps episode 1 vid. Fast forward to the vid where he races out in front of his team against DeMarco’s orders and gets his butt handed to him by a Promethean Knight.
Spartan Tedra Grant: Um….missing in action? Seriously, we haven’t had much interaction with her in the vids.
Spartan Miller: I have to think that the “best and brightest” does NOT include Miller. In fact I’d say he’s the son of some politician or wealthy civilian who wanted to make a name for themselves by having a spartan for a son. He’s a dolt. “Bad Guys” <–another phrase I’m SO tired of. Come on folks, this is a mature rated game. “Bad Guys” and “Eggheads” are childish uses of dialogue.
Finally, Spartan Gabriel Thorne: Of all the others, I’d say he has the most potential. Halsey even seems to think so, though her remarks could be taken as her playing him for a sucker. He’s already disobeyed orders, left in a huff over supposed secrets being kept from him. (That done in the presence of his direct superior as well as ship’s Captain) As well he manages to get himself sucked down to Requiem when touching the artifact, as device I’m pretty sure he didn’t have clearance to go touch by himself.
They’ve all got some serious flaws one way or another. So it’s not just Palmer.
So let’s look at the Pro side.
Palmer: Decorated veteran with a decade of military service before entering the Spartan Program.
DeMarco: Still a leader and can take being humiliated when a mission goes south (Palmer asking him about Hoya, after Hoya is hurt by the Knight)
Madsen: a skilled sniper, he also seems to know his spartan history pretty well.
Grant: Hmm, again not much to say, need more to go on from her.
Miller: Despite his dialogue, it’s clear that he takes his job seriously and is trying to be the best spartan he can be.
Thorne: I’m still thinking he’s going to be the successor to Master Chief. He’s the one who’s gotten the most face time in SpOps. He has taken out plenty of Elites and rescued Dr. Glassman. He’s a rookie Spartan IV so he’s bound to make some mistakes. I think he’s learning and will become a great Spartan.
So what does this say about Spartan IVs? Well, they are flawed. But then we knew they would be. It’s been said in the Halo novels that adults wouldn’t be good candidates for the Spartan program due to being set in their ways mentally as well as having more issues with the rigors of augmentation.
So far, I’m thinking the Spartan IVs are little more than glorified ODSTs. However, that’s not a bad thing. In fact, it means they have just that much more room to improve upon themselves.
By the way, I’m not bad mouthing Spartan Ops/Spartan IVs. I think this behavior shows their human side quite well and gives them character. We can easily differentiate each Spartan IV, not just in armor config, but in their separate and defined personalities.
All this said though…I hope Palmer is killed off so that Master Chief can then become Commander of the Spartans. That’s just a more exciting story line to me than Palmer remaining in charge. Nothing too much against Palmer.
Alright folks, what are your thoughts on these Spartans? Feel free to discus any one in particular or all of them. I want to see what other people think about the Spartan IVs in Halo 4.
-Sal
Would you pay for Spartan Ops season two and how much?
I posted a response over on HaloWaypoint.com regarding the topic of paying for SpOps season 2. I was surprised by the negativity towards SpOps as well as the notion of having to pay for a second season. Here is my response.
Wow, I sincerely hope 343 doesn’t listen to the majority of responses in this thread.
Spartan Ops is awesome. Since Firefight was taken out, this replaced it. IMHO, SpOps is MUCH better. Not only do we get a 5-7 minute video, but missions to go with it. It would be near pointless and wasteful if 343 just had the vids made without the missions.
As well, those missions actually mean something other than defending the same map over and over again ALA Halo Reach.
Talking about maps and their reuse, let’s just take a look at the numbers so far. There are 8 episodes/40 missions.
Here is a listing of the maps in SpOps and what Episode/Chapters they are used in:
Quarry: Ep1/Ch1 Ep3/Ch1 Ep5/Ch5
Sniper Alley: Ep1/Ch2 Ep2/Ch4 Ep4/Ch1
Fortress: Ep1/Ch3 Ep2/Ch3 Ep4/Ch3
Refuge: Ep1/Ch4 Ep2/Ch5 Ep5/Ch2 Ep5/Ch3
The Cauldron: Ep1/Ch5 Ep2/Ch2 Ep4/Ch4 Ep5/Ch4
The Gate: Ep2/Ch1 Ep3/Ch5 Ep5/Ch1
Galileo Base: Ep3/Ch2 Ep4/Ch5
Two Giants: Ep3/Ch3 Ep3/Ch4 Ep4/Ch2
Lockup: Ep6/Ch1 Ep8/Ch4
Control: Ep6/Ch2 Ep8/Ch5
Warrens: Ep6/Ch3 Ep8/Ch3
Cyclone: Ep6/Ch4 Ep8/Ch2
Harvester: Ep6/Ch5
Apex: Ep7/Ch1 Ep8/Ch1
Infinity: Ep7/Ch2, Ch3, Ch4, Ch5
Looking at this, no map was used more than 4 times. However, when used multiple times, missions were using a distinctly different route. Infinity was used 4 times, yet each time was different due to different portions of the map being unlocked.
Now let’s just look at the amount of maps made for season 1 so far. FIFTEEN! Come on folks, we didn’t even have that many in Reach, yet we got that many so far within 3 months release of Halo 4. You folks who are complaining about reuse of maps are with respect a bit ridiculous.
We only got 10 Firefight maps in Reach and it was the SAME THING EVERYTIME. Maybe a slight variation on which vehicles showed up or which enemy squads came out, but it was the same thing. Okay sure there were some slight variations like Score Attack/2X Score Attack/Gruntpocalypse, but they were essentially the same thing. You NEVER unlocked new areas of the maps, you were never tasked with objectives (other than Generator Defense which, IMO was boring). You always defended the same areas of the map. BTW, those Firefight maps in Reach were SMALL. Well most of them in comparison to Spartan Ops maps.
We still have two episodes to go in Spartan Ops and I know there is at least one more NEW map.
Given all this, PLUS the videos AND cut scenes, if you can’t find some fun in Spartan Ops, then you need ot look at yourself and not complain about Spartan Ops. It’s MILES beyond Firefight. The fact that you get to engage in a campaign like atmosphere, with a firefight like gameplay AND achieve objectives…Wow, that’s just awesome.
Is the issue that certain maps are redux of Campaign or War Games maps? Um, hello, Reach’s Firefight did that too and with LESS maps. Also, just looks at what the Spartan Ops team at 343 is doing with those redux maps. Different times of day, unlocking areas not seen in Campaign or War Games, creating new areas within those redux maps. They are NOT the same. Similar yes, but not the same.
As for me, I’d totally pay 800MSP, maybe even 1200. This portion of Halo 4 is what keeps me coming back over and over again, especially when I might not have XBL friends on to game with.
I really think that majority in this thread are being unfairly too hard on Spartan Ops. Just think about this. If 343 where to listen to you folks, they would likely stop making SpOps. Then what? No more story to keep us intrigued until Halo 5. No more NEW maps to discover and game on and being forced to play War Games when you otherwise might not want to?
Give me MORE Spartan Ops and take my money while your at it 343! I LOVE Spartan OPS!!!
[end copy/paste]
So what do you folks think? Would you be willing to pay for a second season of Spartan Ops? If so how much. What might you want to see changed/fix/added in the next season.
Heh, I haven’t gone into what I’d like to see added. Ad far as changed? Nothing. I like who SpOps is progressing. As well, I don’t really see much that needs to be fixed. I really REALLY enjoy Spartan Ops.
-Sal
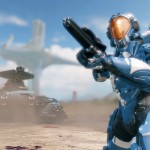
Spartan Ops episode 9 preview gallery: Video screencaps
Woot, I can’t wait for this episode. It’s the next to the last and the action is really ramping up here. Palmer finally puts her helmet on and goes out into battle. Or at least a man (or is that woman?) hunt. She’s out to get Halsey as ordered by Admiral Serin Ozman of ONI.


This episode is called “Key” and I bet it’s going to be very KEY to the Halo universe going forward. Halsey gets what looks like two index keys from the Librarian. Somehow one ends up with Jul M’dama and the other with Spartan Thorne (man I just knew he was going to play a more important part going forward). Hmm, I wonder if the Librarian makes Jul and the UNSC make a peace treaty?
Also note the keys are Red and Blue. Coincidence? I don’t think so. And I’d venture to guess one is the Didact’s while the other is the Librarian’s.
Hmm, this episode is getting better and better and it’s not even out yet!
-Sal
Spartan Ops episode 9 preview gallery chapter missions.
The first gallery is of mission screencaps. Looks like we’re getting a new map! WOOT!! As well “Apex” makes it’s return.


-Sal
Spartan Ops Episode 9 trailer!!!
All I can say is, OH MY! I think this episode is going to ROCK!
Finally Palmer puts her helmet on AND goes into battle on Requiem!
Halsey meeting the Librarian. Oh, this is going to be SOOO GOOD!
-Sal
Woot, my Spartan Ops Ep5 comic book is on Halo Waypoint!
http://blogs.halowaypoint.com/post/2013/02/06/Fan-made-Halo-4-Spartan-Ops-Graphic-Novel-Part-5.aspx
Thanks to BS Angel for posting it up there!
-Sal