Episode 1 “Departure”, Mission 3 The Challenge

Map: Fortress
Objectives: Destroy Jammer, turn off jamming arrays, turn off main power.
Recommended Loadout: Since there are a fair amount of Crawlers you combat during this mission, I recommend using a BR. It’s a powerful scoped weapon. However, the main reason I recommend it for this level is for it’s 3-shot burst. You only need put one shot into the head of a crawler and it will go down. So dont’ waste your energy on a DMR where you have to be more precise. Use the BR and give yourself 3 shots to hit them. For your secondary weapon it’s your choice. AR is perfectly acceptable here, as is the Carbine. Bear in mind though, that you’ll likely have to switch out weapons at some point for more ammo. So pick up those dead crawlers suppressors! I use Jet pack heavily on this map as it makes it much easier and quicker to get to objectives, especially given the objective atop the center tall tower.
Walkthrough:

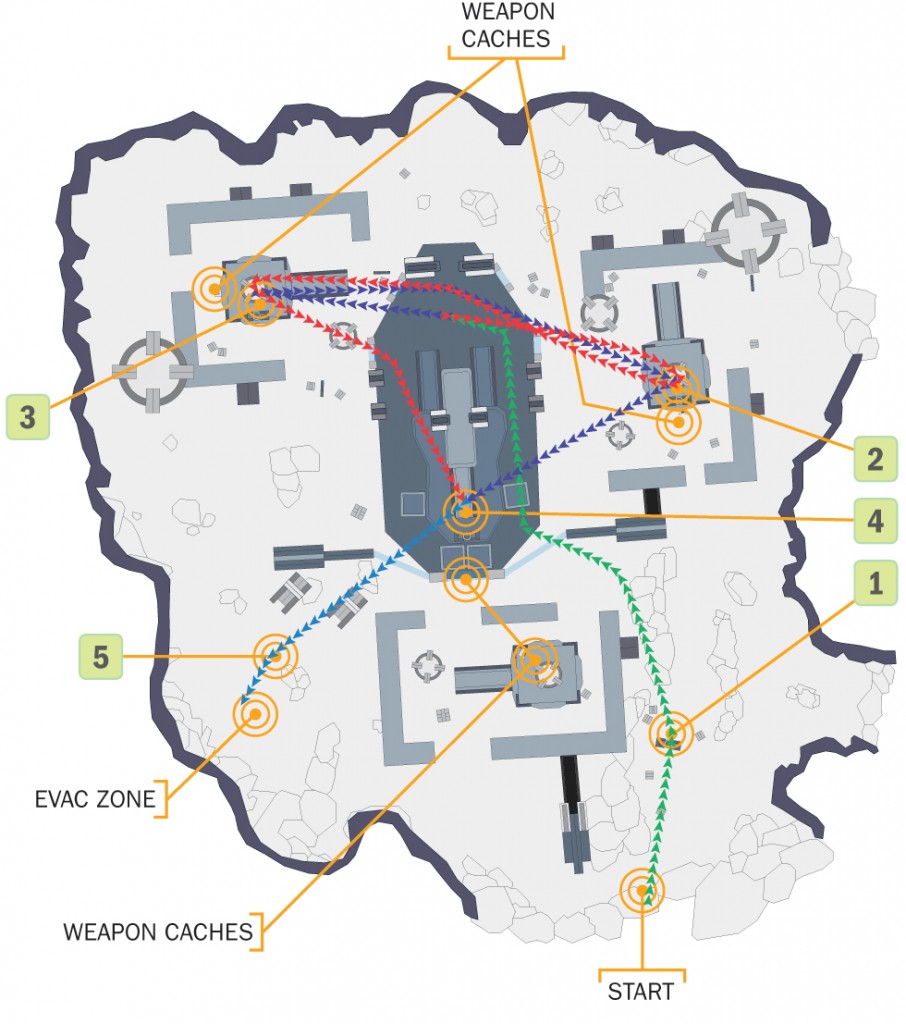
Okay so as you see, I’ve added different color arrows to the paths I normally take. This is to show divergent paths that I typically take during this mission. Start off following the green path. Along the way you destroy the jammer (point 1). You can pick up a rocket launcher along they way. Do it. It will help clear out those crawlers easily. From there, jet pack up to the mid-level of the tower and wait for the next two objectives to activate. Keep in mind that Watchers will spawn intermittently during this mission. As with ANY Spartan Ops mission, it is imperative to take them out. While they themselves do not pose a huge threat to you in gunfire, it’s their ability to spawn Forerunner Turrets and in other missions, respawn Knights that can cause you serious problems. So take them out!
At this point you can choose which one you go for first. This is where I show the divergent paths. You can take the red path to point 2 then point 3, or, the dark blue path to point 3, then point 2. It doesn’t matter which. If you’re playing co-op, then have a teammate go to the opposite one you went to, to shut them both down quicker.
From here, go to the top of the tower to power it down. Pick of any remaining Prometheans and wait for your evac point. Before going straight to it, if you want to get some real fire power, go to the base of the main tower, opposite of the ramp (in the pic it’s the weapon cache at the south point of the main tower). There you will find an Incineration cannon. This is extremely helpful as you will face a small horde of crawlers. The cannon can take out several easily in one shot. You can still easily defeat the crawlers without the cannon. That just makes it easier. Follow the light blue path to your evac point, kill off any remaining crawlers and watchers and wait for extraction.
Commendations you can work on with this mission: There are certainly plenty of crawlers to kill here as well as well as watchers. However, there are missions in later episodes that offer far more crawlers to kill. You’re choice, but I’d choose those other missions over this one to kill crawlers, just for the shear numbers.
Mission Stats:

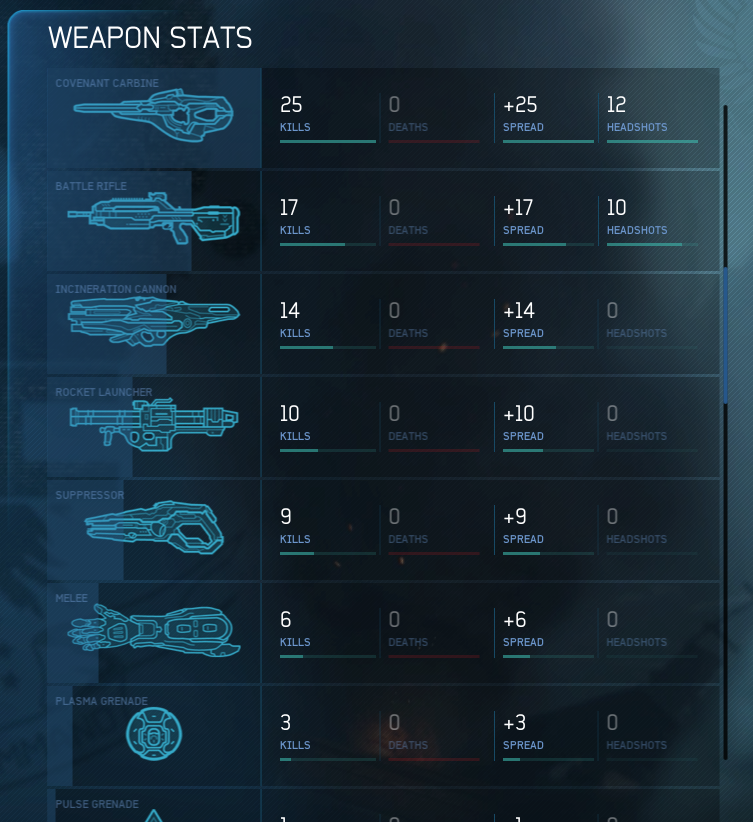
As you can see I diversify my weapons usage here. I make heavy use of my initial loadout weapons. Then as my ammo is depleted I switch to those power weapons as mentioned above and snag a suppressor.

Again, this mission is good for Crawlers and Watchers. But if you want more in one mission, then you can by-pass this one. Still, it’s a good mission to replay if just for the pure firefight enjoyment of it.
-Sal
