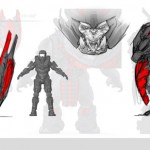
Here’s the source I got these from: http://conceptartworld.com/?p=17549
Here is the art:

As promised here is the next section in the Mega Bloks Forward Unto Dawn signature series model. This section took about 2 and a half hours to complete. I was missing just one piece, though thankfully not integral to the build. Technically it’s three pieces those as the two others I had were 2X1 slopes of the higher angle rather than the smaller angle as shown in the directions (these two will be pointed out in the next article). Aside from this, the build has gone on flawlessly and thankfully for the rest of the build there were not other issues as well.
Now, on to the pics!

The lower prong of the front section is started. Note the repetition here as in previous sections. It really helps in the strength/stability of the model.

The lower prong’s base shape is essentially complete. Now for underside.

I really like how Mega used reverse slope pieces here. And nice BIG ones too. Again stability.

And now for some greeblies and walls topside!

Yet more greeblies and the walls of the armory start to really take shape.

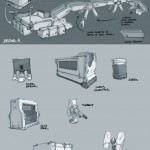
The armory panels to be inserted. 3 SMGs, 3 Magnums, 5 Assault rifles, 3 Frag Grenades, a Radio backpack, and finally the sticky detonator round out what you see here. Also included are a Covenant Plasma Rifle for the Elite and a grey BR for Master Chief.


A couple of views of the armory. Really nice job here on Mega’s part. Good bit of weapons. I do wish the had more detail, like the Sticky Detonator. But really, these guns will just stay in their lockers anyway, so I’m fine with them being black. It likely helped to keep costs down too.

The top prong is built similarly to the bottom one. Note the long bloks extending form the right. These will be placed on the walls of the armory to position the prong and add stability.

Okay, now here is where Mega could have chosen to cheap out, but they DIDN’T! Kudos to them for adding greeblies to the bottom side of the top prong. As seen in the next pic, it really adds character to the empty space between the prongs. Here is where I was missing one part. Look to the top middle just right. There is a 2X1 plate in the two semi curved sections. Now look at the bottom. It’s not there. That was one of the parts missing. Again, not essential, though I’ll be asking Mega for that part.

If you can see it, there is a clear 2×2 blok near the front of the prongs that ties them together. It adds stability, while not interfering with the look.

Here’s the top side assembly of the top prong. Note on the right side of the pic is where a soon to be built removable section of the roof will be housed.

The front shot shows were some neat attachments will be placed….in the NEXT part of the build!
Now, does this look a bit boxy at this point? Sure, but that does NOT tell the full tale. Come back and see the next part where I build the roof and side panels. Those really flesh out this portion of the ship and make it go from being boxy to being smexy!
-Sal

Okay, today’s challenges are a bit more reasonable. Both easy enough to get with extended gameplay.
Okay, so Thanksgiving slowed me down a bit on this project as I was away for a couple of days. Now that I’m back, I’m all over the project. In fact I’m literally over with the project. It’s finished! Originally I had planned on 4 parts for this project, but I think I’m going to stretch it to 5 or 6 parts now that I see the amount of photos and description this model needs.
So here is the third part. The Aft Roof.

Above shows various panels built to be attached to the side of the aft part of the ship. Some really cool parts here. I especially like the ones with the clear blue panels.

Here are those same panels attached. They REALLY help to flesh out the sides of the ship.

Now we have the wing assemblies. These really show the camo effect of the bloks. I actually wish this would have been with solid color bloks than camo effect. No need for camo in space, imo.

The wings attached.

This is the start of the top part of the aft portion of the ship. It includes what will be the “bridge” of the ship. All those “arms” you see at the bottom will have roof panels snapped into them.

The bridge assembly further along. I like the way MEGA used their curved parts and wasn’t afraid to have them built inverted. Nice touch actually!

Here are the panels I mentioned. Easy to build. They are mirrored from side to side. I actually built these at the same time instead of one side at a time. I just mirrored the panel I built to make the other side’s panel. Very easy to do.

They’re now attached to the finished bridge section. This already looks like a spaceship itself…

Here it is placed on top of the ship. What’s cool is how it attaches. It’s NOT permanent. And that’s a good thing. It makes it easy to get to the inside of the ship at any time.

The next spine section. This one is in front of the bridge spine section.


The panels for that spine and attached. I like the little gun mounts. However, be careful as the hooks that attach to the sloped bloks aren’t tight, so you can easily knock them off if you’re not careful.


Added to the ship and a cool front view showing the ship in perspective.


And from the rear. Hmm, I’m thinking I may have to put some fiber optics in this ship. It would make it look VERY cool, especially in the dark.

And here it is from the top. Just look at all that great detail!
Okay, so at this point you COULD actually stop. It just depends on if you want to have the WHOLE ship or just the part that is in Halo 4. The only thing you’d need to do now is add the stickers.
But I can’t do that. I have to complete the ship. So on to part 4 where you’ll see the front section of the ship come together.
-Sal